How To Use IoT SSH From Anywhere On Ubuntu Server
Mastering IoT SSH access on Ubuntu Server is crucial for modern tech enthusiasts and professionals. Whether you’re managing remote devices or automating processes, this guide will walk you through the essentials of setting up secure and efficient SSH connections for your IoT devices.
In today’s interconnected world, Internet of Things (IoT) devices are becoming increasingly common. As more devices connect to the internet, the need for secure and reliable remote access solutions grows. One of the most powerful tools for achieving this is SSH, or Secure Shell, which allows users to remotely manage their devices securely.
This comprehensive guide will cover everything you need to know about configuring IoT SSH on Ubuntu Server. From setting up your server to troubleshooting common issues, we’ll ensure you have the knowledge and tools to connect to your IoT devices from anywhere in the world.
Read also:Divas Flawless Xxx Unveiling The Glamorous Side Of Perfection
Table of Contents
- Introduction to SSH
- Why Use Ubuntu Server for IoT?
- Preparing Your System
- Configuring SSH on Ubuntu
- Securing Your SSH Connection
- Accessing Your IoT Devices Remotely
- Troubleshooting Common Issues
- Best Practices for IoT SSH
- Advanced Configurations
- Conclusion
Introduction to SSH
SSH, or Secure Shell, is a cryptographic protocol used to securely connect to remote servers and devices. It provides a secure channel over an unsecured network, ensuring that your data remains private and protected from unauthorized access. For IoT devices, SSH is an essential tool for remote management and monitoring.
Key Features of SSH:
- Encrypted communication between devices
- Authentication using passwords or public key cryptography
- Support for secure file transfers via SCP and SFTP
Understanding SSH is the first step in mastering how to use IoT SSH from anywhere on Ubuntu Server. By the end of this section, you’ll have a solid foundation for setting up your IoT devices.
Why Use Ubuntu Server for IoT?
Ubuntu Server is one of the most popular Linux distributions for server environments, and for good reason. Its stability, security, and ease of use make it an ideal choice for managing IoT devices. Additionally, Ubuntu Server comes with built-in support for SSH, making it easy to set up remote access for your devices.
Advantages of Using Ubuntu Server
- Open-source and free to use
- Regular updates and long-term support (LTS)
- Wide range of community resources and documentation
- Compatibility with a variety of IoT platforms and tools
By choosing Ubuntu Server as your platform, you can take advantage of its robust features while ensuring that your IoT devices remain secure and accessible from anywhere.
Preparing Your System
Before you can start using IoT SSH on Ubuntu Server, you’ll need to ensure that your system is properly configured. This involves installing the necessary software, setting up your network, and configuring your firewall. Below are the steps to prepare your system:
Read also:Viral Mms Sex Understanding The Phenomenon And Its Impact
Step 1: Install Ubuntu Server
Begin by installing the latest version of Ubuntu Server on your IoT device. You can download the ISO file from the official Ubuntu website and follow the installation instructions provided.
Step 2: Update Your System
Once the installation is complete, update your system to ensure that all packages are up to date. Run the following commands:
sudo apt update && sudo apt upgrade
Step 3: Configure Networking
Ensure that your device is connected to the internet and has a static IP address. This will make it easier to connect to your device remotely. You can configure your network settings using the Netplan tool or by editing the network interface file.
Configuring SSH on Ubuntu
With your system prepared, the next step is to configure SSH. By default, SSH is installed on Ubuntu Server, but you may need to enable and configure it to suit your needs.
Step 1: Enable SSH Service
Check if the SSH service is running by running the following command:
sudo systemctl status ssh
If the service is not running, you can start it using:
sudo systemctl start ssh
Step 2: Configure SSH Settings
Edit the SSH configuration file located at /etc/ssh/sshd_config. Use a text editor like nano or vi to make changes:
sudo nano /etc/ssh/sshd_config
Some important settings to consider include:
- Port: Change the default port (22) to a custom port for added security.
- PasswordAuthentication: Set to "no" to disable password-based authentication.
- PermitRootLogin: Set to "no" to prevent root login.
Securing Your SSH Connection
Security is paramount when it comes to IoT SSH. Without proper security measures, your devices could be vulnerable to attacks. Below are some tips for securing your SSH connection:
Use Public Key Authentication
Public key authentication is a more secure alternative to password-based authentication. To set it up, generate a key pair using the ssh-keygen command:
ssh-keygen -t rsa -b 4096
Copy the public key to your server using:
ssh-copy-id user@server_ip
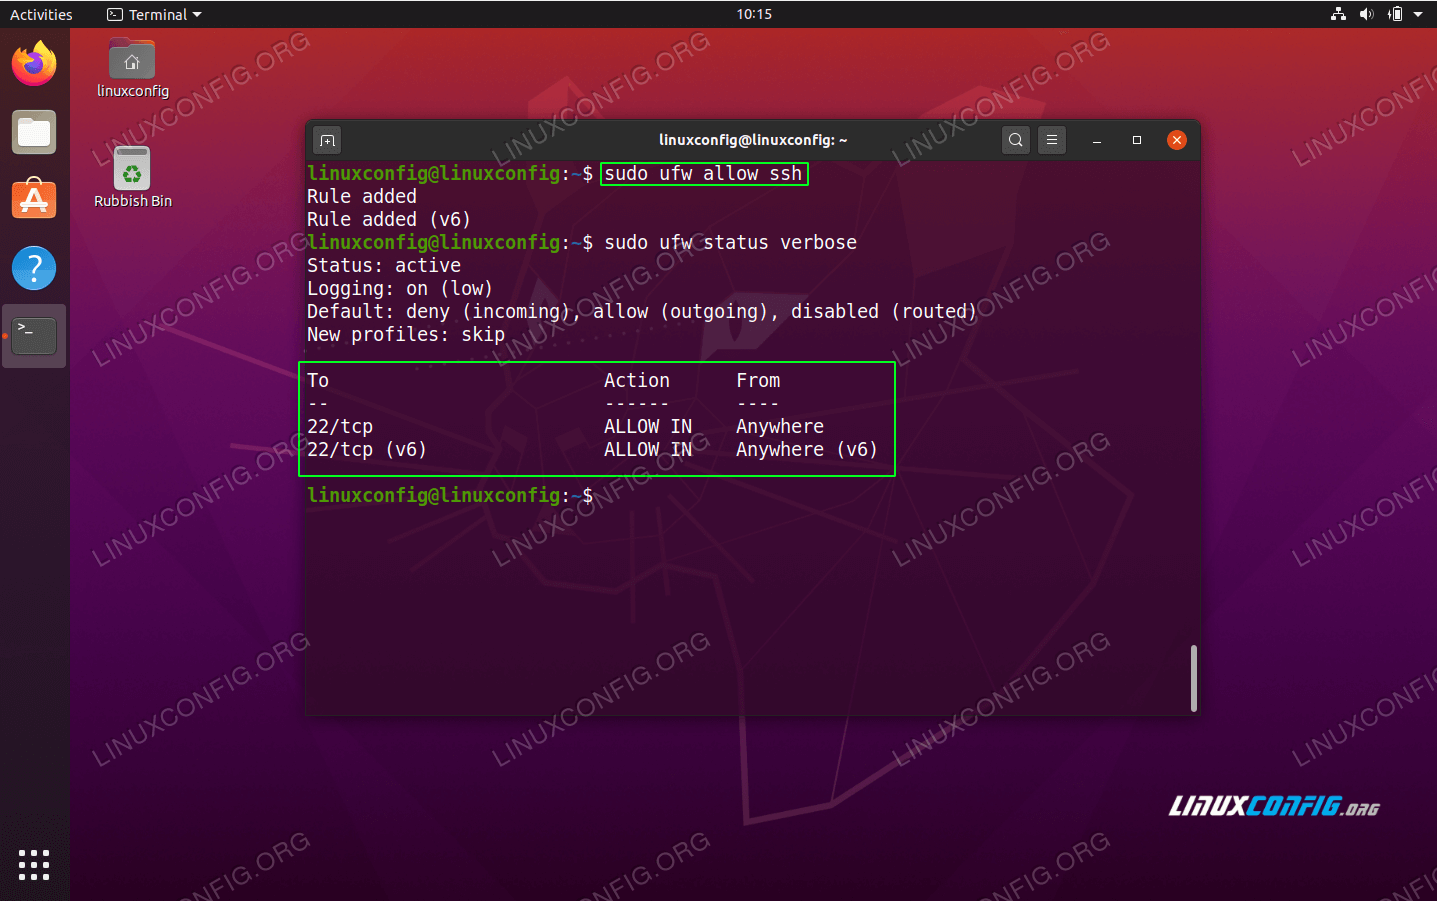
Enable Firewall Rules
Use ufw (Uncomplicated Firewall) to restrict access to your SSH port. For example, to allow SSH on port 2222, run:
sudo ufw allow 2222/tcp
Monitor and Log Activity
Regularly monitor your SSH logs for suspicious activity. Logs are located at /var/log/auth.log. You can use tools like fail2ban to automatically block IP addresses that attempt unauthorized access.
Accessing Your IoT Devices Remotely
Once your SSH server is configured and secured, you can access your IoT devices from anywhere in the world. Below are some methods for achieving this:
Method 1: Using a Static IP Address
If your device has a static IP address, you can connect to it directly using the SSH command:
ssh user@static_ip
Method 2: Using a Dynamic DNS Service
For devices with dynamic IP addresses, consider using a dynamic DNS service like No-IP or DuckDNS. These services provide a hostname that updates automatically when your IP address changes.
Method 3: Port Forwarding
Configure port forwarding on your router to allow external access to your SSH port. Be sure to use a non-standard port for added security.
Troubleshooting Common Issues
Even with careful planning, issues can arise when setting up IoT SSH on Ubuntu Server. Below are some common problems and their solutions:
Issue 1: Unable to Connect
Ensure that your SSH service is running and that your firewall rules allow access to the SSH port. Check your network configuration to ensure that your device is reachable from the internet.
Issue 2: Authentication Failed
Verify that your username and password are correct. If you’re using public key authentication, ensure that your public key is correctly added to the authorized_keys file on the server.
Issue 3: Connection Timeout
Check your network connection and ensure that there are no firewall or router settings blocking your SSH traffic. You may also need to adjust the SSH timeout settings in the configuration file.
Best Practices for IoT SSH
To ensure the best possible experience when using IoT SSH on Ubuntu Server, follow these best practices:
- Regularly update your system and SSH software to patch security vulnerabilities.
- Use strong, unique passwords or public key authentication for added security.
- Limit access to your SSH server by restricting IP addresses or using tools like fail2ban.
- Monitor your logs regularly for suspicious activity and take action if necessary.
Advanced Configurations
For advanced users, there are several additional configurations that can enhance your IoT SSH experience:
Setting Up a Reverse SSH Tunnel
A reverse SSH tunnel allows you to connect to a device behind a firewall or NAT. This can be useful for accessing IoT devices in remote locations. To set up a reverse SSH tunnel, use the following command:
ssh -R 2222:localhost:22 user@remote_server
Configuring SSH Tunnels for IoT Communication
SSH tunnels can be used to securely transmit data between IoT devices. This is especially useful for applications that require encrypted communication. Use the -L or -R options to create local or remote tunnels as needed.
Conclusion
Using IoT SSH from anywhere on Ubuntu Server is a powerful way to manage and monitor your devices remotely. By following the steps outlined in this guide, you can ensure that your devices remain secure and accessible from any location.
Key Takeaways:
- SSH provides a secure and encrypted connection for remote access.
- Ubuntu Server is an excellent choice for managing IoT devices.
- Securing your SSH connection is essential for protecting your devices.
- Best practices and advanced configurations can enhance your IoT SSH experience.
We encourage you to leave a comment below if you have any questions or feedback. Don’t forget to share this article with others who may find it helpful. For more tips and tutorials, explore our other articles on IoT and Ubuntu Server!

